在manim的丰富图形库中,圆形类是一个基础且强大的模块。 无论是简单的圆形绘制,还是复杂的圆形变换,它都能以简洁的代码实现。

manim中圆形类的相关模块主要有3个:

  1. Circle:标准的圆形
  2. Annulus:圆环形状
  3. Ellipse:椭圆形状

其中,Annulus和Ellipse继承自Circle。
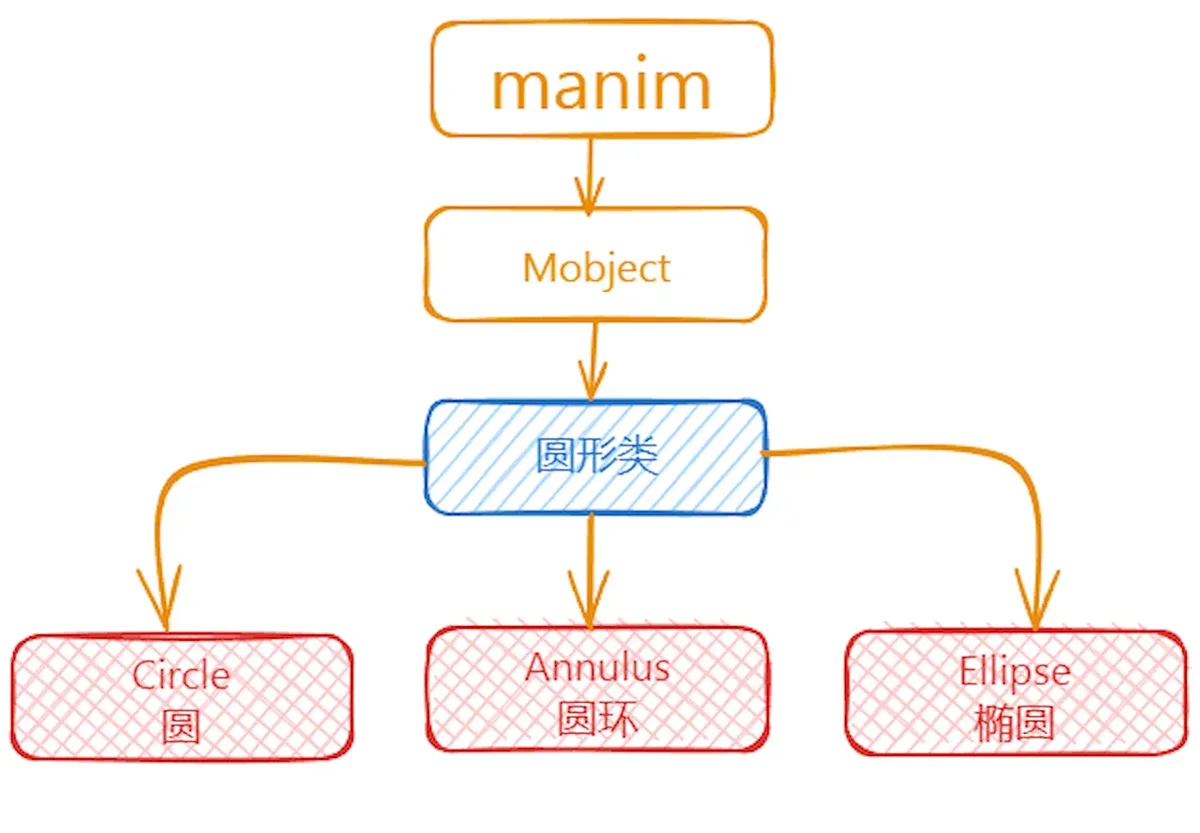
image.png

圆形系列处于manim中的Mobject之下。

1. 主要参数

圆Circle对象的属性不多,主要有:

参数名称 类型 说明
radius float 半径
color ParsableManimColor 颜色,可传RED等常量或'#425AEF'这样的十六进制字符串
stroke_width float 边框厚度
fill_opacity float 填充不透明度,0 为全透明、1 为完全不透明

圆环Annulus对象的主要属性有:

参数名称 类型 说明
inner_radius float 内圈半径
outer_radius float 外圈半径
color ParsableManimColor 颜色,可传RED等常量或'#425AEF'这样的十六进制字符串
mark_paths_closed bool 是否把内外两条路径标记为闭合;默认False,一般保持默认即可

Annulus会渲染inner_radius和outer_radius之间的部分,也就是一个环。

椭圆Ellipse对象的主要属性有:

参数名称 类型 说明
width float 椭圆宽度
height float 椭圆高度

椭圆的宽度和高度设置成一样的时候,就是标准的圆。

2. 主要方法

圆Circle对象有3个常用的方法:

名称 说明
from_three_points 根据3个点画圆
point_at_angle 返回某个点在圆上的位置
surround 修改一个圆,使其围绕给定的对象

圆环Annulus和椭圆Ellipse没有常用的方法。

3. 使用示例

3.1. 大小和颜色

对于圆Circle来说,通过半径radius来调节大小;

对于圆环Annulus来说,通过内半径inner_radius和外半径outer_radius来调节环的大小和粗细;

对于椭圆Ellipse来说,通过width和height来调节椭圆的大小和扁平程度。

三种形状的颜色都是color属性。

1
2
3
4
5
6
7
8
9
10
11
12
13
14
15
16
17
18
19
20
21
22
23
24
25
26
27
28
29
from manim import *
class CircleSizeColor(Scene):
"""3.1 Circle 用 radius、Annulus 用 inner/outer_radius、Ellipse 用 width/height 调大小。
三种形状都靠 color 指定颜色,下面按 3 行 3 列把 9 个示例排开便于对照。
"""
def construct(self):
title = Text("大小和颜色", font="STLiti", font_size=34).to_edge(UP)
self.play(Write(title), run_time=0.8)
circles = [Circle(radius=r, color=c) for r, c in
((0.15, RED), (0.35, BLUE), (0.60, YELLOW))]
annuli = [Annulus(inner_radius=i, outer_radius=o, color=c)
for i, o, c in ((0.10, 0.22, RED), (0.20, 0.40, BLUE),
(0.35, 0.65, YELLOW))]
ellipses = [Ellipse(width=w, height=h, color=c)
for w, h, c in ((0.5, 0.25, RED), (1.0, 0.5, BLUE),
(1.6, 0.8, YELLOW))]
cells = VGroup()
for row in (circles, annuli, ellipses):
cells.add(*row)
cells.arrange_in_grid(rows=3, cols=3, buff=(1.2, 0.9))
labels = VGroup(*[Text(n, font="STLiti", font_size=22)
for n in ("Circle", "Annulus", "Ellipse")])
for lab, row in zip(labels, (circles, annuli, ellipses)):
lab.next_to(VGroup(*row), LEFT, buff=0.6)
VGroup(cells, labels).scale(0.9).shift(DOWN * 0.3)
self.play(LaggedStart(*[FadeIn(x) for x in cells], lag_ratio=0.12),
run_time=2.4)
self.play(FadeIn(labels), run_time=0.6)
self.wait(2.6)

效果如下:

下载 Python 脚本

3.2. 根据三个点画圆

除了通过上面设置半径radius的方式来画圆,还可以根据任意三个点来生成一个圆形。使用from_three_points方法。

1
2
3
4
5
6
7
8
9
10
11
12
13
14
15
16
17
18
19
20
21
22
23
24
25
from manim import *
class CircleFromThreePoints(Scene):
"""3.2 Circle.from_three_points(p1, p2, p3) 过任意三个不共线的点画圆。
下面先把三点画出来,再生成圆,可以直观看到圆同时经过这三点。
"""
def construct(self):
title = Text("三点画圆 from_three_points", font="STLiti", font_size=32).to_edge(UP)
d1 = Dot(RIGHT, color=RED)
d2 = Dot(UL, color=BLUE)
d3 = Dot(DR, color=GREEN)
dots = VGroup(d1, d2, d3)
circle = Circle.from_three_points(
d1.get_center(), d2.get_center(), d3.get_center(), color=YELLOW)
caps = VGroup(
Text("P1", font="STLiti", font_size=24).next_to(d1, UR, buff=0.1),
Text("P2", font="STLiti", font_size=24).next_to(d2, UL, buff=0.1),
Text("P3", font="STLiti", font_size=24).next_to(d3, DR, buff=0.1),
)
VGroup(circle, dots, caps).scale(1.2)
note = Text("圆同时经过 P1 / P2 / P3", font="STLiti", font_size=26).to_edge(DOWN)
self.play(Write(title), run_time=0.8)
self.play(FadeIn(dots), FadeIn(caps), run_time=1.0)
self.play(Create(circle), run_time=1.4)
self.play(FadeIn(note), run_time=0.6)
self.wait(2.4)

下载 Python 脚本

3.3. 获取圆上某个点

通过方法point_at_angle,我们可以根据角度来获取圆上的某一个点。 manim将整个圆最右边的点(和圆心在同一高度上)作为角度为 的点,然后逆时针方向逐渐增加角度。传入point_at_angle的角度用弧度制,例如PI / 6对应 30 度、PI对应 180 度。

1
2
3
4
5
6
7
8
9
10
11
12
13
14
15
16
17
18
19
20
21
22
23
from manim import *
class CirclePointAtAngle(Scene):
"""3.3 point_at_angle(angle) 返回指定角度处圆上的坐标(弧度制)。
0 度在最右侧,角度按逆时针增加;下面把 0 / 30 / 180 / 270 度四个点标出来。
"""
def construct(self):
title = Text("圆上取点 point_at_angle", font="STLiti", font_size=32).to_edge(UP)
self.play(Write(title), run_time=0.8)
c = Circle(radius=2.0, color=YELLOW)
center = Dot(ORIGIN, color=GREY_B)
self.play(Create(c), FadeIn(center), run_time=1.0)
specs = [(0, "0 度", RIGHT), (PI / 6, "30 度", UR),
(PI, "180 度", LEFT), (3 * PI / 2, "270 度", DOWN)]
pts, caps = VGroup(), VGroup()
for ang, name, direction in specs:
p = c.point_at_angle(ang)
pts.add(Dot(p, color=BLUE))
caps.add(Text(name, font="STLiti", font_size=22)
.next_to(p, direction, buff=0.18))
self.play(LaggedStart(*[FadeIn(d) for d in pts], lag_ratio=0.3),
run_time=1.6)
self.play(FadeIn(caps), run_time=0.6)
self.wait(2.6)

下载 Python 脚本

3.4. 用圆环绕其他图形

最后,还有一个surround方法,它的主要作用是将圆环绕在另一个图形上。surround方法有个buffer_factor 参数, 当buffer_factor >= 1时,圆形环绕在图形外部;当buffer_factor < 1时,圆形在图形内部。
特别注意:surround会原地修改并返回这个圆,必须把返回值接住再加入场景,即c = Circle().surround(obj)后self.add(c);像早期示例那样直接写Circle().surround(obj)而不接返回值,画面上不会出现任何圆。

1
2
3
4
5
6
7
8
9
10
11
12
13
14
15
16
17
18
19
20
21
22
23
24
25
26
27
28
29
30
31
32
33
from manim import *
class CircleSurround(Scene):
"""3.4 surround(mobject, buffer_factor=...) 让圆恰好环绕指定图形。
buffer_factor >= 1 时圆在图形外部,< 1 时圆缩进到图形内部。
关键:surround 原地修改并返回这个圆,必须接住返回值再加入场景,
写成 Circle().surround(obj) 而不接返回值,画面上就什么圆都没有。
"""
def construct(self):
title = Text("用圆环绕图形 surround", font="STLiti", font_size=32).to_edge(UP)
self.play(Write(title), run_time=0.8)
star = Star(color=BLUE)
c_star = Circle(color=YELLOW).surround(star, buffer_factor=1.2)
cross = VGroup(Line(UP / 2, DOWN / 2, color=GREEN),
Line(LEFT / 2, RIGHT / 2, color=GREEN))
c_cross = Circle(color=YELLOW).surround(cross)
tri = Triangle(color=RED)
c_tri = Circle(color=YELLOW).surround(tri, buffer_factor=0.6)
groups = VGroup(
VGroup(star, c_star),
VGroup(cross, c_cross),
VGroup(tri, c_tri),
).arrange(RIGHT, buff=1.6)
caps = VGroup(
Text("buffer 1.2 外部", font="STLiti", font_size=22),
Text("buffer 默认 1.2", font="STLiti", font_size=22),
Text("buffer 0.6 内部", font="STLiti", font_size=22),
)
for cap, g in zip(caps, groups):
cap.next_to(g, DOWN, buff=0.45)
self.play(LaggedStart(*[FadeIn(g) for g in groups], lag_ratio=0.35),
run_time=2.2)
self.play(FadeIn(caps), run_time=0.6)
self.wait(2.6)

下载 Python 脚本