manim中绘制一个角度其实就是绘制两条直线,本篇介绍的不是绘制角度,而是绘制角度标记。
对于锐角和钝角,角度标记是一个弧,弧的度数与角的度数一样;
对于直角,角度标记是一个垂直的拐角。
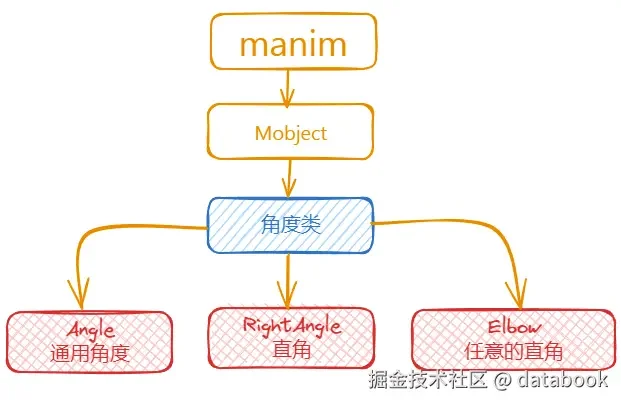
manim中关于角度标记的模型主要有3个:
Angle:根据两条直线绘制角度标记RightAngle:根据两条互相垂直的线绘制直角标记Elbow:不受限于直线,任意方向和大小的直角标记
其中,RightAngle模块继承自Angle。
角度标记的主要作用是在动画中标记出一些特殊角度,更好的展示数学定理的证明过程。
1. 主要参数
Angle模块是通用的角度标记,它的主要参数有:
| 参数名称 |
类型 |
说明 |
| line1 |
Line |
构成角度的第一条线 |
| line2 |
Line |
构成角度的第二条线 |
| radius |
float |
角度标记的半径 |
| quadrant |
Point2D |
此参数控制角度标记显示在哪个位置 |
| other_angle |
bool |
True:顺时针从line1到line2 False:逆时针从line1到line2 |
| dot |
bool |
是否在角度标记中显示一个点 |
| dot_radius |
float |
点的半径 |
| dot_distance |
float |
点到圆弧(角度标记)的相对距离 |
| dot_color |
Color |
点的颜色 |
| elbow |
bool |
是否显示成直角的形状 |
后面在使用示例中演示这些参数的使用。
RightAngle模块继承自Angle,除了上面Angle的参数之外,还有一个自己特有的参数。
| 参数名称 |
类型 |
说明 |
| length |
float |
标记的大小 |
Elbow模块与上面两个不一样,它不是根据两条线来生成角度标记。
| 参数名称 |
类型 |
说明 |
| width |
float |
标记的大小 |
| angle |
float |
标记朝向那个方向 |
Elbow的形状和RightAngle是一样的。
2. 主要方法
Angle模块的方法主要有3个:
| 名称 |
说明 |
| from_three_points |
根据三个点来生成角度标记 |
| get_lines |
获取生成角度的两条线 |
| get_value |
获取角度的值 |
一般我绘制一个角度标记时,都是根据两条相交的线来确定角度位置的。
通过from_three_points方法,可以根据任意3个点来生成一个角度标记。
1
2
3
4
5
6
7
8
9
10
11
12
13
14
15
16
17
18
19
20
21
22
23
24
25
26
| from manim import *
class AngleFromThreePoints(Scene):
"""2. Angle.from_three_points(A, B, C) 以 B 为顶点,从 A 转到 C 生成角度标记。
默认取逆时针的大角(288.43 度);加 other_angle=True 才取小角(71.57 度)。
返回的 Angle 还能用 get_lines() 取两条构成线、get_value() 读角度值。
"""
def construct(self):
title = Text("三点定角 from_three_points", font="STLiti", font_size=32).to_edge(UP)
A, B, C = RIGHT + 3 * UP, ORIGIN, RIGHT
line1 = Line(B, A, color=BLUE)
line2 = Line(B, C, color=YELLOW)
angle = Angle.from_three_points(A, B, C, other_angle=True,
radius=0.9, color=GREEN)
dots = VGroup(Dot(A, color=BLUE), Dot(B, color=WHITE), Dot(C, color=YELLOW))
labels = VGroup(
Text("A", font="STLiti", font_size=26).next_to(A, RIGHT),
Text("B", font="STLiti", font_size=26).next_to(B, DL),
Text("C", font="STLiti", font_size=26).next_to(C, DOWN),
)
group = VGroup(line1, line2, angle, dots, labels).scale(0.9).shift(2 * LEFT)
note = Text("B 是顶点,从 A 转到 C", font="STLiti", font_size=26).to_edge(DOWN)
self.play(Write(title), run_time=0.8)
self.play(Create(line1), Create(line2), run_time=1.0)
self.play(Create(angle), FadeIn(dots), FadeIn(labels), run_time=1.0)
self.play(FadeIn(note), run_time=0.6)
self.wait(2.8)
|
函数的参数是A,B,C三个点,
生成的角度以B为顶点,从点A到点C逆时针旋转。
注意:默认取的是逆时针的大角(约 288 度);示例里加了other_angle=True,才会画出 71.57 度的小角,也就是大家通常想标记的那个角。
下载 Python 脚本
方法get_lines可获取构成角度的两条线,也就是上图中的BA,BC两条线。
1
2
3
4
5
6
7
8
9
10
11
12
13
14
| from manim import *
class AngleGetLines(Scene):
"""Angle.get_lines() 返回构成这个角的两条线(VGroup)。
下面把它们取出来依次高亮,验证它们就是传入的 line1 与 line2。
"""
def construct(self):
line1 = Line(LEFT, RIGHT, color=BLUE)
line2 = Line(DOWN, UP, color=YELLOW)
angle = Angle(line1, line2, radius=0.6, color=WHITE)
lines = angle.get_lines()
self.add(line1, line2, angle)
self.play(Indicate(lines[0], color=RED), run_time=1.2)
self.play(Indicate(lines[1], color=GREEN), run_time=1.2)
self.wait(1)
|
最后,get_value方法,可以实时得到当前角度的值,值可以是度数,也可以是弧度。
1
2
3
4
5
6
7
8
9
10
11
12
13
14
15
16
17
18
19
20
21
| from manim import *
class AngleGetValue(Scene):
"""Angle.get_value() 读角度值:degrees=True 返回度数,默认返回弧度。
下面这组点构成 71.565 度的角,正好对应文章里给出的运行结果。
"""
def construct(self):
A, B, C = RIGHT + 3 * UP, ORIGIN, RIGHT
angle = Angle(Line(B, C), Line(B, A), radius=0.9)
deg = angle.get_value(degrees=True)
rad = angle.get_value()
print("角度:%s" % deg)
print("弧度:%s" % rad)
info = VGroup(
Text("度数 %.4f 度" % deg, font="STLiti", font_size=30),
Text("弧度 %.4f rad" % rad, font="STLiti", font_size=30),
).arrange(DOWN, buff=0.4).shift(3 * RIGHT)
self.add(Line(B, C), Line(B, A), angle, info)
self.wait(1)
|
3. 使用示例
3.1. 角度大小
因为角度标记Angle是一个弧形,所以角度的大小通过参数radius(半径)来调整。
radius只改变标记弧的半径,不会改变两条线的夹角度数;下面四个十字用的是同一个直角,只是标记大小不同。
1
2
3
4
5
6
7
8
9
10
11
12
13
14
15
16
17
18
19
20
| from manim import *
class AngleRadius(Scene):
"""3.1 radius 决定角度弧的半径,只改标记大小、不改角的度数。
四个同样的直角配上不同 radius,横向排开便于对照。
"""
def construct(self):
title = Text("角度大小 radius", font="STLiti", font_size=34).to_edge(UP)
self.play(Write(title), run_time=0.8)
groups = VGroup()
for r in (0.15, 0.35, 0.55, 0.75):
l1 = Line(LEFT, RIGHT, color=GREY_B)
l2 = Line(DOWN, UP, color=GREY_B)
arc = Angle(l1, l2, radius=r, color=YELLOW)
cap = Text("r = %.2f" % r, font="STLiti", font_size=22)
cap.next_to(VGroup(l1, l2), DOWN, buff=0.35)
groups.add(VGroup(l1, l2, arc, cap))
groups.arrange(RIGHT, buff=1.1).scale(0.85)
self.play(LaggedStart(*[FadeIn(g) for g in groups], lag_ratio=0.3),
run_time=2.4)
self.wait(3.0)
|
下载 Python 脚本
3.2. 角度位置
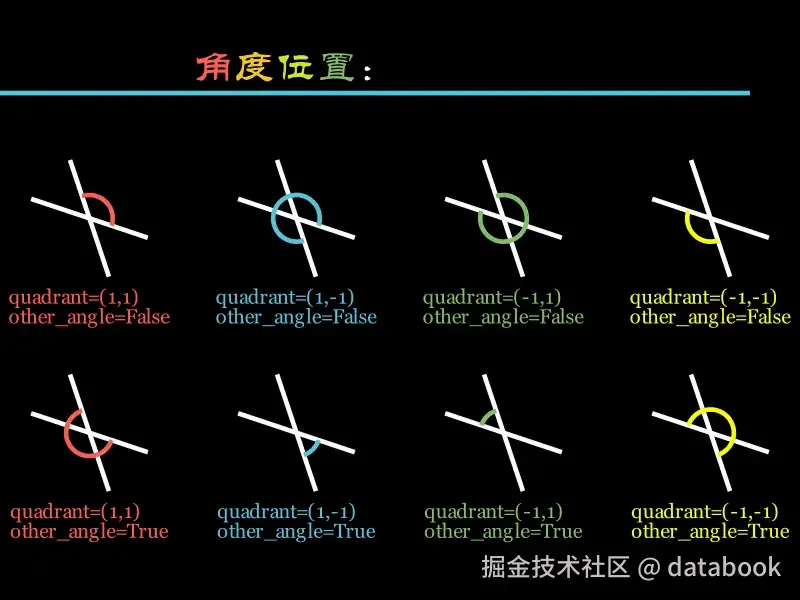
角度标记的位置由两个参数来控制,quadrant和other_angle。
quadrant参数一共有四种选项:(1, 1)或(1, -1)或(-1, 1)或(-1, -1)
这个参数分两部分,分别表示角度标记在Line1上的起点位置和在Line2上的终点位置。
比如下面相交的两条直线,quadrant的第一个值和第二个值分别在Line1和Line2上的位置如图。
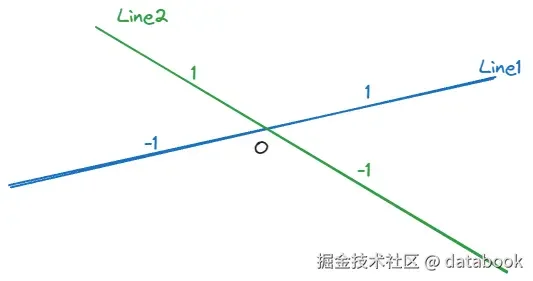
other_angle默认为False,表示绘制角度时从Line1到Line2;
设置other_angle为True时,绘制角度的顺序相反,从Line2到Line1。
1
2
3
4
5
6
7
8
9
10
11
12
13
14
15
16
17
18
19
20
21
22
23
24
25
26
27
28
29
30
| from manim import *
class AngleQuadrant(Scene):
"""3.2 quadrant 决定角标记落在哪个象限,other_angle 决定旋转方向。
8 种组合按 2 行 4 列排开,方便逐一对照;每条弧都基于同一组相交直线。
"""
def construct(self):
title = Text("角度位置 quadrant / other_angle", font="STLiti", font_size=30).to_edge(UP)
self.play(Write(title), run_time=0.8)
combos = [
(dict(), "默认 (1,1)"),
(dict(quadrant=(1, -1)), "(1,-1)"),
(dict(quadrant=(-1, 1)), "(-1,1)"),
(dict(quadrant=(-1, -1)), "(-1,-1)"),
(dict(other_angle=True), "other 默认"),
(dict(quadrant=(1, -1), other_angle=True), "other (1,-1)"),
(dict(quadrant=(-1, 1), other_angle=True), "other (-1,1)"),
(dict(quadrant=(-1, -1), other_angle=True), "other (-1,-1)"),
]
l1 = Line(LEFT + 1 / 3 * UP, RIGHT + 1 / 3 * DOWN, color=GREY_B)
l2 = Line(DOWN + 1 / 3 * RIGHT, UP + 1 / 3 * LEFT, color=GREY_B)
cells = VGroup()
for kw, name in combos:
c = VGroup(l1.copy(), l2.copy())
arc = Angle(c[0], c[1], radius=0.35, color=YELLOW, **kw)
cap = Text(name, font="STLiti", font_size=18).next_to(c, DOWN, buff=0.25)
cells.add(VGroup(c, arc, cap))
cells.arrange_in_grid(rows=2, cols=4, buff=(1.2, 0.9)).scale(0.8)
self.play(LaggedStart(*[FadeIn(x) for x in cells], lag_ratio=0.15),
run_time=2.8)
self.wait(2.4)
|
上面的完整脚本把 8 种quadrant / other_angle组合排成 2 行 4 列,复制成 .py 后可直接用manim -qh 脚本.py运行,不依赖视频文件。
3.3. 角度中的点
Angle中可以加一个点的标记,当一个画面中有很多角度的时候,这个标记可以帮助我们区分不同的角。
通过dot_radius,dot_distance和dot_color等参数,可以调整点的大小,位置和颜色。
1
2
3
4
5
6
7
8
9
10
11
12
13
14
15
16
17
18
19
20
21
22
23
24
25
26
| from manim import *
class AngleDotParams(Scene):
"""3.3 dot=True 会在角弧旁放一个小点,用来区分画面里的多个角。
dot_radius 调点的大小,dot_distance 调点到弧的距离,dot_color 调颜色。
"""
def construct(self):
title = Text("角度中的点 dot", font="STLiti", font_size=34).to_edge(UP)
self.play(Write(title), run_time=0.8)
specs = [
(dict(dot=True, dot_radius=0.02, dot_color=RED), "小红点 0.02"),
(dict(dot=True, dot_radius=0.08, dot_color=BLUE), "大蓝点 0.08"),
(dict(dot=True, dot_distance=0.2, dot_color=GREEN), "近距离 0.2"),
(dict(dot=True, dot_distance=0.8, dot_color=YELLOW), "远距离 0.8"),
]
groups = VGroup()
for kw, name in specs:
l1 = Line(LEFT, RIGHT, color=GREY_B)
l2 = Line(DOWN, UP, color=GREY_B)
arc = Angle(l1, l2, radius=0.45, color=WHITE, **kw)
cap = Text(name, font="STLiti", font_size=22)
cap.next_to(VGroup(l1, l2), DOWN, buff=0.35)
groups.add(VGroup(l1, l2, arc, cap))
groups.arrange(RIGHT, buff=1.1).scale(0.85)
self.play(LaggedStart(*[FadeIn(g) for g in groups], lag_ratio=0.3),
run_time=2.4)
self.wait(3.0)
|
下载 Python 脚本
3.4. 直角标记
最后,还有一个特殊的角度标记–直角标记。
manim中提供了2个模块来标记直角,RightAngle和Elbow。
它们的显示效果差不多,区别在于,RightAngle需要根据两条线来生成,
而Elbow更加灵活一些,它可以在任意位置生成直角标记。
1
2
3
4
5
6
7
8
9
10
11
12
13
14
15
16
17
18
19
20
21
22
23
24
25
26
27
28
29
30
31
32
33
34
35
36
37
| from manim import *
class RightAngleDemo(Scene):
"""3.4 RightAngle 依据两条互相垂直的线生成直角标记,Elbow 可独立摆放。
length / width 控制大小,quadrant 控制所在象限,angle 控制 Elbow 朝向。
"""
def construct(self):
title = Text("直角标记 RightAngle / Elbow", font="STLiti", font_size=32).to_edge(UP)
self.play(Write(title), run_time=0.8)
def cross():
return VGroup(Line(LEFT, RIGHT, color=GREY_B),
Line(DOWN, UP, color=GREY_B))
ra_specs = [
(dict(length=0.2), "length 0.2"),
(dict(length=0.4), "length 0.4"),
(dict(quadrant=(1, -1)), "quadrant (1,-1)"),
(dict(quadrant=(-1, -1)), "quadrant (-1,-1)"),
]
el_specs = [
(dict(width=0.5), "width 0.5"),
(dict(width=1.0), "width 1.0"),
(dict(width=1.0, angle=PI / 2), "angle PI/2"),
(dict(width=1.0, angle=5 * PI / 4), "angle 5PI/4"),
]
cells = VGroup()
for kw, name in ra_specs:
c = cross()
mark = RightAngle(c[0], c[1], color=YELLOW, **kw)
cap = Text(name, font="STLiti", font_size=20).next_to(c, DOWN, buff=0.3)
cells.add(VGroup(c, mark, cap))
for kw, name in el_specs:
mark = Elbow(color=BLUE, **kw)
cap = Text(name, font="STLiti", font_size=20).next_to(mark, DOWN, buff=0.3)
cells.add(VGroup(mark, cap))
cells.arrange_in_grid(rows=2, cols=4, buff=(1.1, 0.9)).scale(0.72)
self.play(LaggedStart(*[FadeIn(x) for x in cells], lag_ratio=0.18),
run_time=2.6)
self.wait(2.6)
|
下载 Python 脚本
4. 附件

主观感受,仅供参考。本文采用 本文采用 CC BY-NC-SA 4.0 许可 协议,
完整转载请注明来自
数学动画引擎。