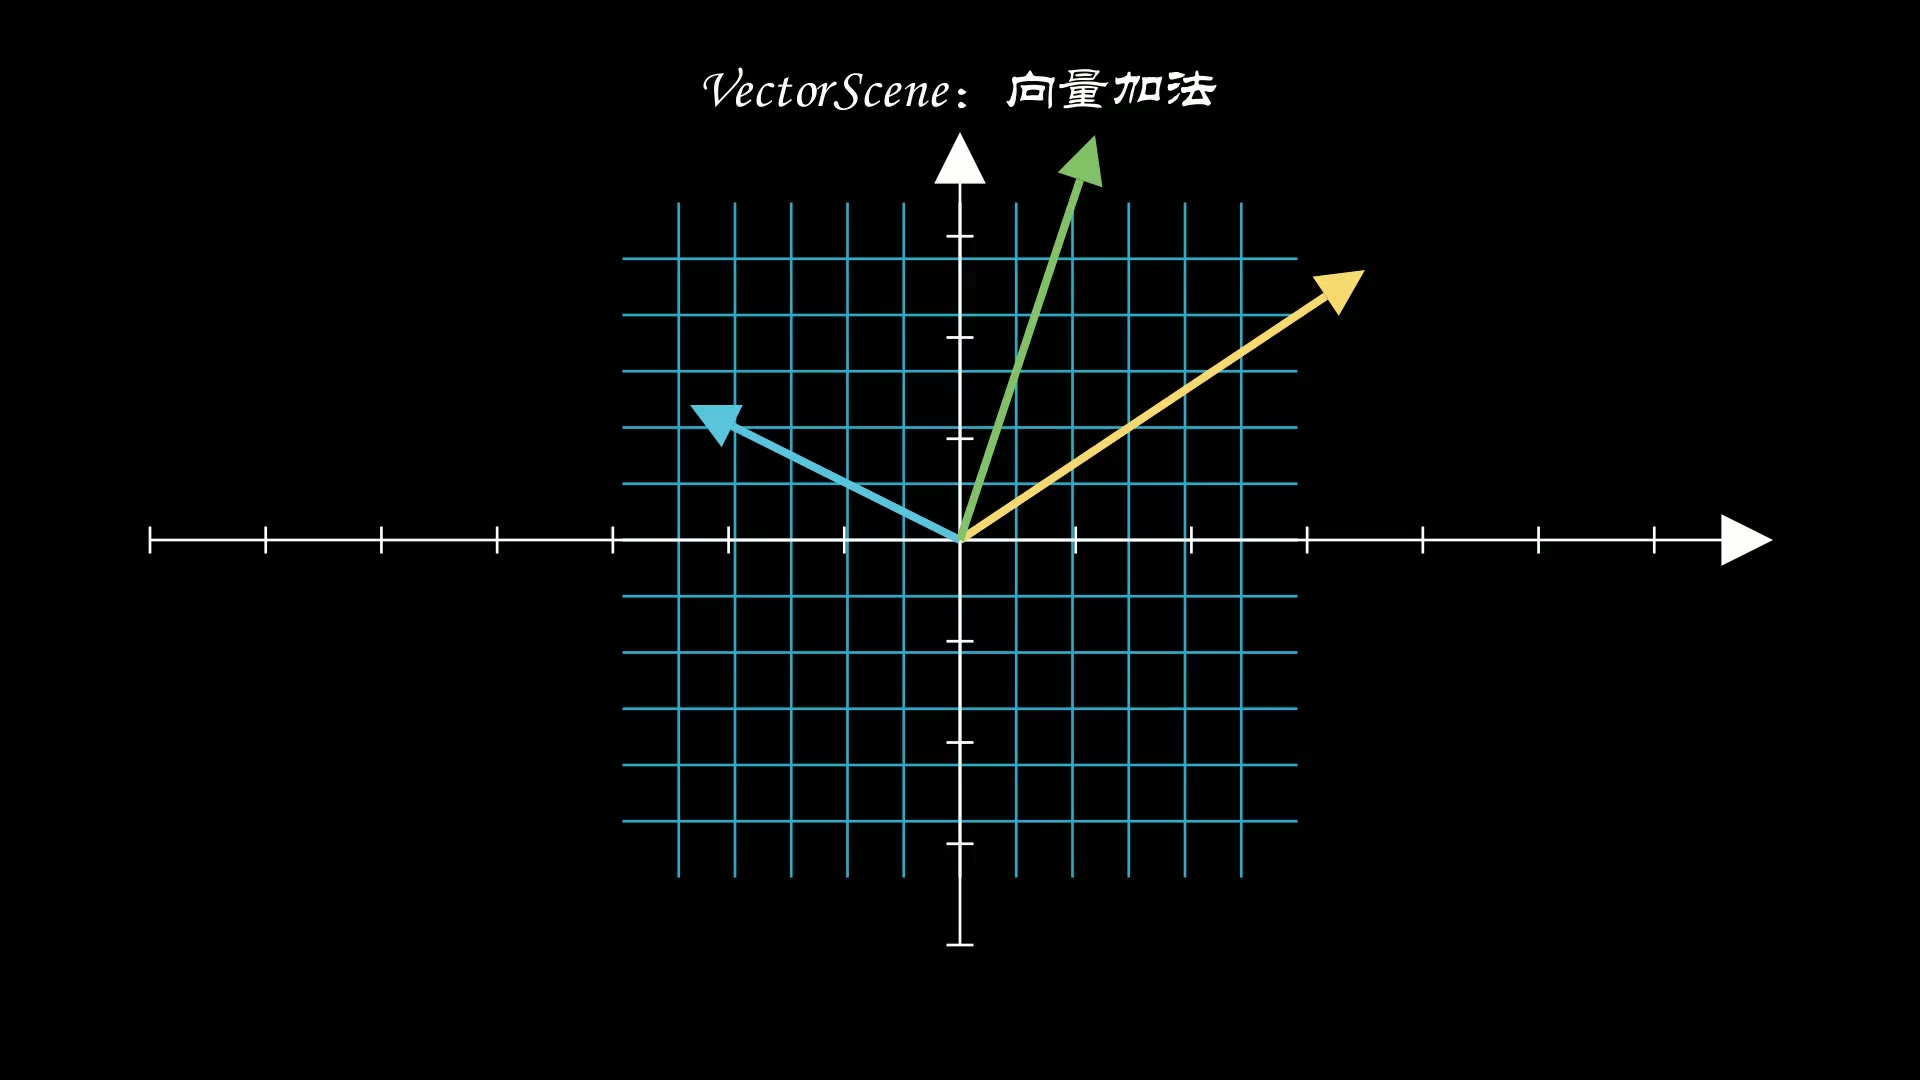
带箭头的直线就是有方向的直线,既可以用来表示矢量,也可以用来标记某个关键位置。
manim中提供了4种常用的带箭头的直线模块:
Arrow:单箭头的直线DoubleArrow:双箭头的直线LabeledArrow:带标签的直线Vector:向量
其中,DoubleArrow,LabeledArrow和Vector都继承自Arrow模块,
而Arrow模块继承自上一次介绍的Line模块。
Vector表面看起来Arrow一样,也是一个单箭头直线,它们的主要区别在于:
Arrow需要设置起点和终点,而Vector只要设置终点,它的的起点固定为坐标系原点。
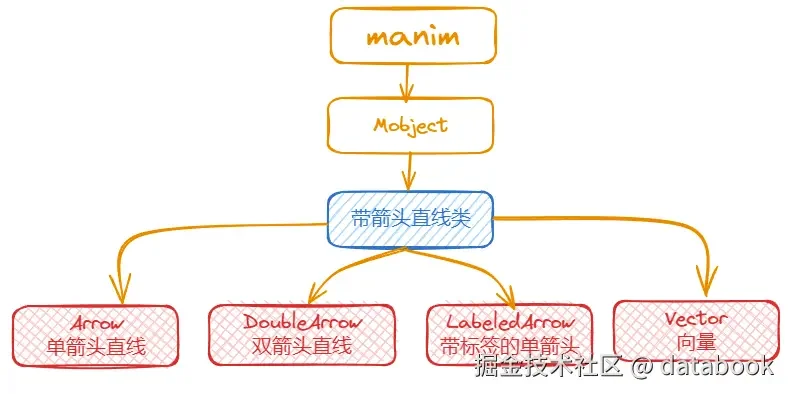
带箭头直线系列的模块位于manim中的Mobject之下。
1. 主要参数
Arrow模块的主要参数有:
| 参数名称 |
类型 |
说明 |
| start |
Point3D |
起点 |
| end |
Point3D |
终点 |
| stroke_width |
float |
箭头的粗细 |
| buff |
float |
箭头两端到起终点的留白,值越大箭头越短 |
| max_tip_length_to_length_ratio |
float |
箭头尖端长度与整条线长度之比,值越大箭头越大 |
| max_stroke_width_to_length_ratio |
float |
线宽与箭头长度之比,值越大线条相对越粗 |
| tip_shape |
VMobject |
箭头的类型,本质就是一个几何对象 |
其中,start和end参数继承自Line模块。
DoubleArrow模块的参数与Arrow基本一致,只是它两头都有箭头。
Vector模块的主要参数有:
| 参数名称 |
类型 |
说明 |
| direction |
Point2D/Point3D |
向量的方向,相当于终点 |
Vector模块只需要设置终点,也就是direction。其他参数可以参考Arrow模块。
模块LabeledArrow可以在箭头直线上加一个便签,用于添加额外的说明信息。
它继承自LabeledLine,而LabeledLine又继承自Arrow,
所以start、end、buff、tip\_shape这些参数照常可用。
Manim CE 0.21 写法提示:早期教程里的font_size=、label_color=、
label_frame=、frame_fill_color=、frame_fill_opacity=会被透传给Mobject,
在 0.21 直接抛TypeError。现在字号、颜色、底框统一收进下面三个字典参数。
| 参数名称 |
类型 |
说明 |
| label |
str / Text / MathTex |
字符串交给MathTex渲染,适合公式;中文必须传Text(字, font="STLiti")对象,否则 LaTeX 编译报 Unicode 错 |
| label_position |
float |
标签在直线上的位置,默认0.5(正中间) |
| label_config |
dict |
标签配置,如{"font_size": 32, "color": RED} |
| box_config |
dict |
标签背后的填充矩形,如{"color": GREEN, "fill_opacity": 0.8} |
| frame_config |
dict |
标签外框;想去掉边框可对arrow.label.frame调用set_stroke(opacity=0) |
2. 主要方法
Arrow模块的主要方法有:
| 名称 |
说明 |
| get_default_tip_length |
获取箭头的长度 |
| get_normal_vector |
获取向量的法线 |
| reset_normal_vector |
重置向量的法线 |
| scale |
缩放向量 |
DoubleArrow和LabeledArrow的方法和Arrow一样。
Vector除了上面Arrow的方法,还有一个自己特有的方法:
| 名称 |
说明 |
| coordinate_label |
基于向量的坐标显示向量的值 |
比如:
1
2
3
4
5
6
7
8
9
10
11
12
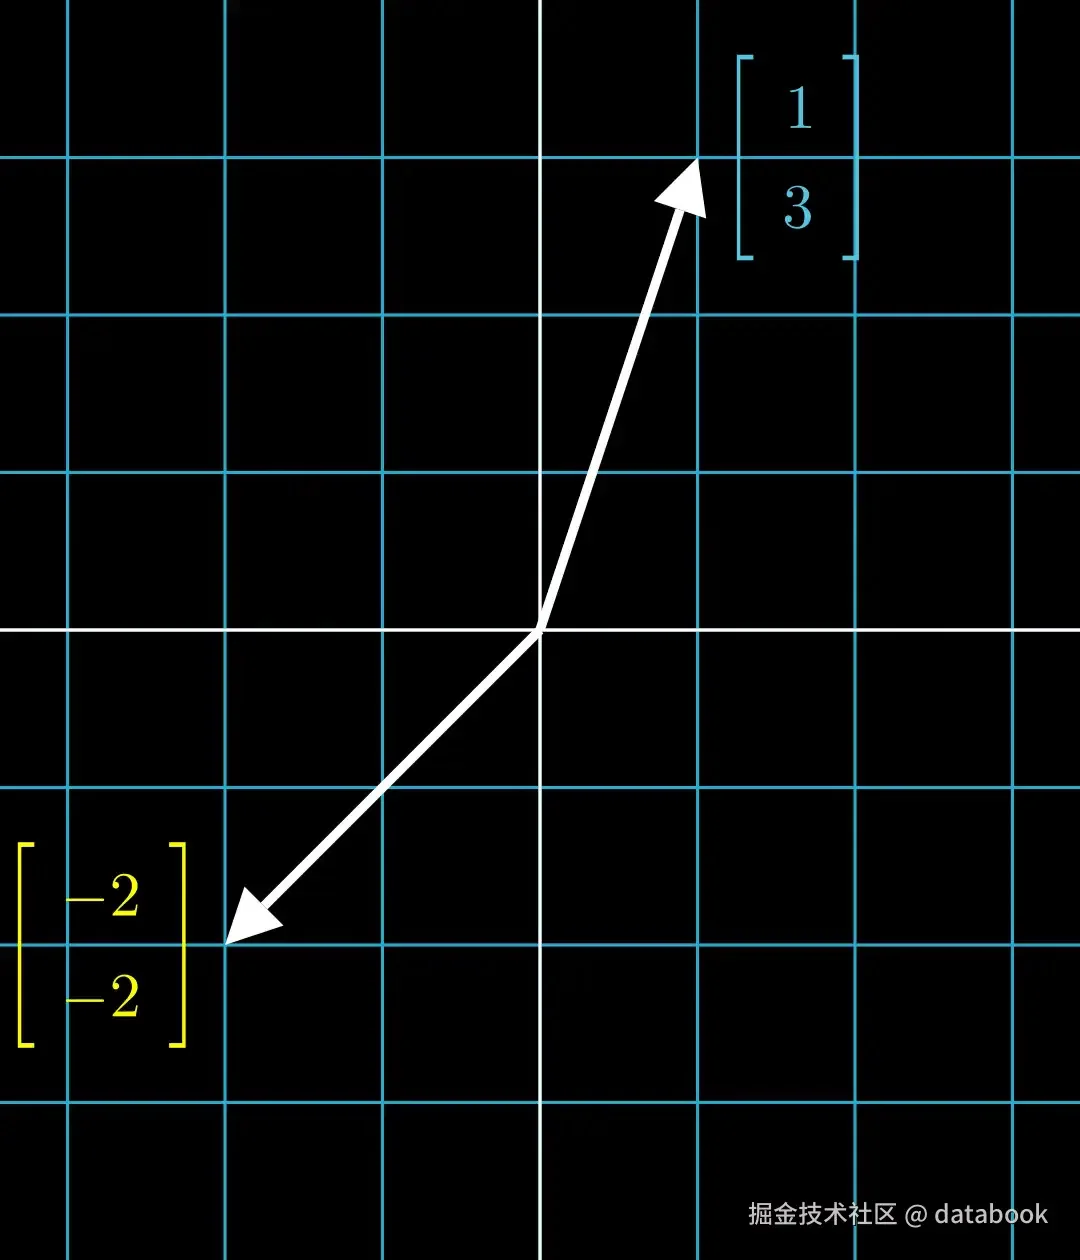
| from manim import *
class CoordinateLabelExample(Scene):
"""Vector.coordinate_label():按向量方向自动生成列向量坐标标签。
label 本身是一个 Matrix,可像普通 Mobject 一样改颜色、改位置。
"""
def construct(self):
vec_1 = Vector([1, 3])
vec_2 = Vector([-2, -2])
label_1 = vec_1.coordinate_label(color=BLUE)
label_2 = vec_2.coordinate_label(color=YELLOW)
self.add(vec_1, vec_2, label_1, label_2)
self.wait(1)
|
下载 Python 脚本
3. 使用示例
3.1. 箭头和线的比例
通过buff,max_stroke_width_to_length_ratio和max_tip_length_to_length_ratio参数,
可以调整箭头和直线的比例,使之符合不同动画场景的需要。
1
2
3
4
5
6
7
8
9
10
11
12
13
14
15
16
17
18
19
20
21
22
23
24
25
26
27
28
29
30
31
32
33
34
35
36
| from manim import *
class ArrowRatio(Scene):
"""3.1 三个参数如何改变「箭头 : 直线」的视觉比例。
每列演示一个参数,从上到下依次增大取值,便于横向对照。
"""
def construct(self):
title = Text("箭头与直线的比例", font="STLiti", font_size=36).to_edge(UP)
self.play(Write(title), run_time=0.8)
col1 = VGroup(*[
Arrow(2 * LEFT, 2 * RIGHT, buff=b)
for b in (0, 0.25, 0.5, 0.75)
]).arrange(DOWN, buff=0.42)
col2 = VGroup(*[
Arrow(2 * LEFT, 2 * RIGHT, max_stroke_width_to_length_ratio=r)
for r in (1, 3, 5, 8)
]).arrange(DOWN, buff=0.42)
col3 = VGroup(*[
Arrow(2 * LEFT, 2 * RIGHT, max_tip_length_to_length_ratio=r)
for r in (0.05, 0.12, 0.25, 0.40)
]).arrange(DOWN, buff=0.42)
cols = VGroup(col1, col2, col3).arrange(RIGHT, buff=1.1)
cols.scale(0.62).shift(DOWN * 0.35)
labels = VGroup(
Text("buff", font="STLiti", font_size=26),
Text("线宽 / 箭头", font="STLiti", font_size=26),
Text("箭头 / 线长", font="STLiti", font_size=26),
)
for lab, col in zip(labels, cols):
lab.next_to(col, UP, buff=0.35)
self.play(LaggedStart(*[FadeIn(c) for c in cols], lag_ratio=0.35),
run_time=2.4)
self.play(FadeIn(labels), run_time=0.6)
self.wait(2.0)
|
下载 Python 脚本
3.2. 箭头的样式
箭头的样式不仅仅只有三角形,manim中内置了多种不同的箭头样式。
1
2
3
4
5
6
7
8
9
10
11
12
13
14
15
16
17
18
19
20
21
22
23
24
25
26
27
28
| from manim import *
class ArrowTipShapes(Scene):
"""3.2 tip_shape 决定箭头尖端的形状。
Manim CE 内置 7 种:圆 / 方 / 三角各有实心与空心,另有 StealthTip。
直接传「类」而不是实例,Arrow 内部会负责实例化。
"""
def construct(self):
title = Text("箭头的样式 tip_shape", font="STLiti", font_size=34).to_edge(UP)
self.play(Write(title), run_time=0.8)
shapes = [
(ArrowCircleFilledTip, "实心圆头"),
(ArrowCircleTip, "空心圆头"),
(ArrowSquareFilledTip, "实心方头"),
(ArrowSquareTip, "空心方头"),
(ArrowTriangleFilledTip, "实心三角"),
(ArrowTriangleTip, "空心三角(默认)"),
(StealthTip, "隐形式 Stealth"),
]
rows = VGroup()
for tip, name in shapes:
arrow = Arrow(2.2 * LEFT, 2.2 * RIGHT,
tip_shape=tip, stroke_width=5)
label = Text(name, font="STLiti", font_size=24)
rows.add(VGroup(arrow, label).arrange(RIGHT, buff=0.5))
rows.arrange(DOWN, buff=0.28).scale(0.85).shift(DOWN * 0.25)
self.play(LaggedStart(*[FadeIn(r) for r in rows], lag_ratio=0.22),
run_time=2.8)
self.wait(2.0)
|
下载 Python 脚本
3.3. 向量的样式
向量是一种特殊的带箭头直线,它的起点默认在坐标原点。
其他的属性也可以和上面带箭头的一样进行设置。
1
2
3
4
5
6
7
8
9
10
11
12
13
14
15
16
17
18
| from manim import *
class VectorStyle(Scene):
"""3.3 Vector 的起点恒为坐标系原点,只需要给 direction(终点方向)。
coordinate_label() 按方向自动生成列向量形式的坐标标签(Matrix)。
"""
def construct(self):
vec_1 = Vector([1, 3], color=WHITE)
vec_2 = Vector([-2, -2], color=WHITE)
label_1 = vec_1.coordinate_label(color=BLUE)
label_2 = vec_2.coordinate_label(color=YELLOW)
label_1.next_to(vec_1.get_end(), RIGHT, buff=0.15)
label_2.next_to(vec_2.get_end(), LEFT, buff=0.15)
self.play(GrowArrow(vec_1), GrowArrow(vec_2), run_time=1.2)
self.play(FadeIn(label_1), FadeIn(label_2), run_time=0.8)
self.wait(3.4)
|
3.4. 带标签的箭头
最后,带箭头的直线和普通的直线一样,也可以添加标签信息,用于对直线进行说明。
下面四个例子依次演示:公式标签、中文标签、彩色公式且隐藏边框、绿色底框,
代码按 Manim CE 0.21 的写法给出,复制后可直接用manim -qh 脚本.py运行。
1
2
3
4
5
6
7
8
9
10
11
12
13
14
15
16
17
18
19
20
21
22
23
24
25
26
27
28
29
30
31
32
33
34
35
36
37
38
39
40
41
42
43
| from manim import *
class LabeledArrowDemo(Scene):
"""3.4 LabeledArrow 在箭头中点放一个标签。
Manim CE 0.21 的写法与旧教程不同,务必注意:
* 字符串 label 交给 MathTex 渲染 -> 适合公式;
* 中文 label 必须传 Text(..., font="STLiti") 对象,
否则 LaTeX 编译阶段就会抛 Unicode 错误;
* 字号 / 颜色走 label_config,底框走 box_config,边框走 frame_config;
* 旧写法 font_size=、label_color=、label_frame=、frame_fill_color=
会被透传给 Mobject,在 0.21 直接 TypeError。
"""
def construct(self):
title = Text("带标签的箭头:", font="STLiti",
font_size=34, color=YELLOW).to_edge(UP, buff=0.45)
rule = Line(6.4 * LEFT, 6.4 * RIGHT, color=BLUE)
rule.next_to(title, DOWN, buff=0.25)
self.play(Write(title), Create(rule), run_time=0.9)
start, end = 3.2 * LEFT, 3.2 * RIGHT
a1 = LabeledArrow(label=r"y = kx + b", start=start, end=end)
a2 = LabeledArrow(
label=Text("中文说明", font="STLiti", font_size=28),
start=start, end=end,
)
a3 = LabeledArrow(
label=r"z = \sqrt{x^2 + y^2}",
label_config={"color": RED, "font_size": 32},
start=start, end=end,
)
a3.label.frame.set_stroke(opacity=0)
a4 = LabeledArrow(
label=Text("标签背景", font="STLiti", font_size=28),
box_config={"color": GREEN, "fill_opacity": 0.8},
start=start, end=end,
)
arrows = VGroup(a1, a2, a3, a4).arrange(DOWN, buff=0.75)
arrows.shift(DOWN * 0.55)
self.play(LaggedStart(*[Create(a) for a in arrows], lag_ratio=0.32),
run_time=2.8)
self.wait(2.2)
|
下载 Python 脚本
4. 附件

主观感受,仅供参考。本文采用 本文采用 CC BY-NC-SA 4.0 许可 协议,
完整转载请注明来自
数学动画引擎。